Since a lot of users use TeraBox for archiving and sharing photos, we think it is time to provide a thorough guideline on how to upload photos to TeraBox. Whatever device you are on, you will find the right solution here.
TeraBox gives you 1 TB of free storage space to upload photos from your phone, tablet, and computer. Once you upload the photos to the cloud, you will be able to access, preview, and manage them from anywhere.
Upload Photos from Android/iOS
1) Upload from the App
Step 1: Download TeraBox on Android phone, or download TeraBox on iPhone.
Step 2: Tap the “+” icon at the lower right corner of the home page. Tap “Photos”.
Step 3: Switch albums at the top to view photos stored in different folders, and select the photos you want to upload.

Step 4: Tap “Upload Path” at the bottom to select the upload directory in TeraBox.
Step 5: The upload will start immediately. Tap the double-arrow icon on the upper right of the home page to check the upload progress.

2) Upload from Gallery/Photos
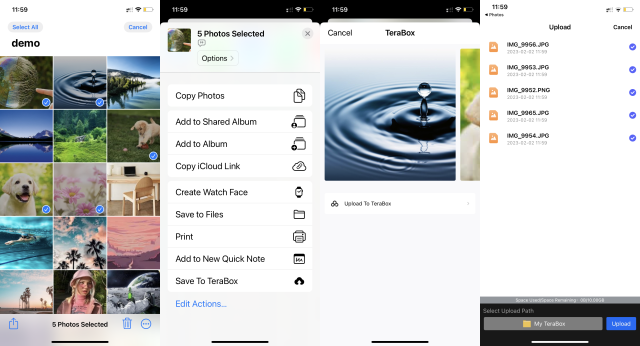
Step 1: Open Gallery (Android) or Photos (iPhone).
Step 2: Select the photos to be uploaded.
Step 3: Tap the share button. Locate and select “Save to TeraBox”.
Step 4: Select an upload path and tap “Upload”.
3) Turn on Automatic Backup
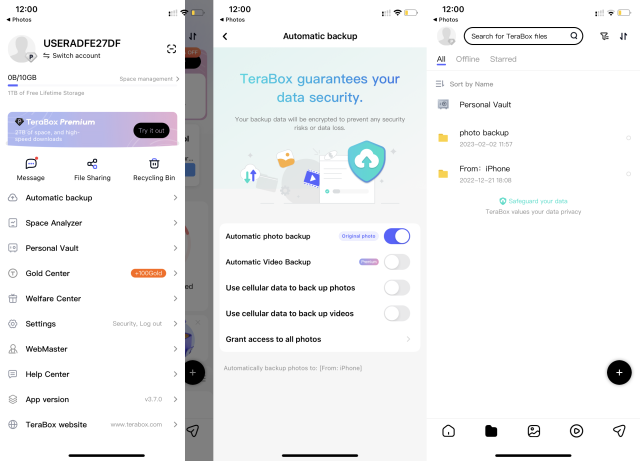
Step 1: Tap the profile icon on the upper left of the home page, or swipe right, to open the menu.
Step 2: Go to “Auomatic backup”.
Step 3: If you are on iPhone, tap “Grant access to app photos” to ensure every new photo can be uploaded automatically.
Step 4: Turn on the “Automatic photo backup” switch.
Step 5: All photos on your phone will be automatically uploaded to the folder “From: [model of your phone]” (Android) or “From: iPhone” (iPhone).
Upload Photos from Windows
1) Manual Upload
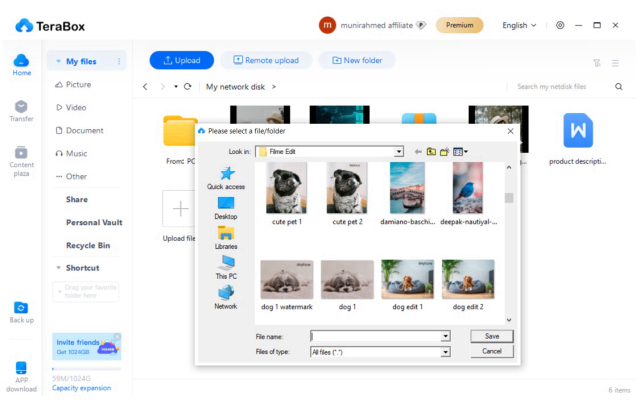
Step 1: Download TeraBox for PC and launch the app. Tap “Upload”.
Step 2: Select the photos from your computer.
Step 3: Double-click to upload a single photo, or click “Save” to upload multiple photos or folder(s).
Alternatively, you can drag and drop photos or folders to the app to start uploading.
Step 4: Click “Transfer” on the left sidebar to view the upload.
2) Automatic Upload
Step 1: Click “Back up” on the left sidebar.
Step 2: Click “Enable Folder Backup” and select the folder(s) with the photos.
Step 3: Click “Change the path” to select the upload location.
Step 4: Click “Back up now”. All photos and files in the folder will be backed up automatically.

Upload Photos from Mac
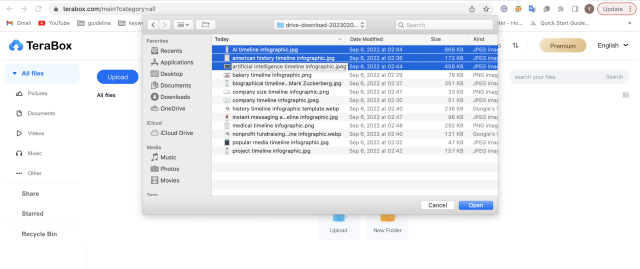
Step 1: Visit TeraBox official website and sign in.
Step 2: Click “Upload” to select photos or folders containing photos for upload. Alternatively, you can drag and drop photos or folders to the browser to start uploading.
Step 3: View upload progress by clicking the double-arrow icon on the upper right.
FAQs about TeraBox Photo Upload
Q: How many photos can I upload to TeraBox?
In total, 1 TB of storage space can hold about 250,000 photos taken by a phone camera.
In the app, the largest file size of upload is 4 GB for the free plan and 20 GB for the premium plan. That is to say, you can upload photos to TeraBox in a zip file of 4 or 20 GB.
Meanwhile, you can upload 500 photos in one go, which also applies to other types of files. For Premium users, there is no limit on the number of files saved at a time.
On the website, however, you can only upload a file as large as 4 GB. The largest number of photos you can upload at a time is 300. This is due to the limitations of browsers and is not related to your subscription status.
Q: Can I delete my photos after uploading them to TeraBox?
Yes, it is easy to delete photos from the cloud. After they are deleted, you can still find them in the Recycling Bin and recover them within 10 days (or 30 days for paid users).

After uploading the photos, you can feel free to delete them from your local storage. TeraBox will keep them safe in the cloud and does not delete them unless you choose to. The only thing you should keep in mind to prevent data loss is the right account and password for login.
Q: What will happen to my photos if I uninstall TeraBox?
If you only uninstall TeraBox, your photos along with your account will be preserved. You will be able to access those photos when you log in to TeraBox on other devices or re-install TeraBox. On the other hand, if you delete your account, all your data and files will be erased along with the account.
Q: What is remote upload? Can I use it to upload photos?
Remote upload is different from upload; it is a feature that allows you to save files directly from the Internet with a link. You can upload a file to TeraBox with an HTTP, HTTPS, magnet, or BitTorrent link. It cannot be used to upload photos to TeraBox from your phone or computer.

To Wrap Up
It is essential to upload photos to the cloud to preserve memories and keep them safe. TeraBox’s parent company—Flextech, strives for optimal experience and satisfaction for users. At TeraBox, we provide a secure, centralized location to store your photos where they can be easily accessed from anywhere in the world. If you find this guide on how to upload photos to TeraBox helpful, stick with us for more just like this one.


It appears as though remote upload is no longer a feature, is this a new scrapped feature or will it be re-implemented?
Thanks for using TeraBox.
Remote upload function is not currently available due to product feature adjustments. We apologize for any inconvenience caused and appreciate your understanding.